Showing posts with label HST. Show all posts

Tuesday, 28 July 2015

Paving Stone Block - Bee Europa


This month is is my turn to take over the Hive in my quilting Bee - "Bee Europa" and i'm pretty excited about it! It's a nice simple block made from HST's but one which i know i wouldn't have the patience to make several of so it seemed like the perfect choice to send out to all my lovely Bee Mates. I will post the tutorial below for you all (and for anyone else who may read this and like to try it out), and as always if you have any questions just get in touch.


I have sent everyone 8 coloured squares and 8 low volume white/cream coloured squares each measuring 5 inches. (The packages sent to each of you vary in colour, i apologise in advance if you end up with a colour you dislike).
Firstly, pair up each coloured block with a low volume one and place right sides together. Draw a diagonal line on the back of the low volume block and sew down each side of the line using 1/4 seam allowance.


Trim along the line in the centre and press open (I tend to press seams open when doing HST's but press open or to the side, whichever you prefer). At this point you can trim the blocks down to 4" squares (there should be plenty of fabric left over here for trimming down).


Arrange your blocks like the image below, the corner blocks being coloured and the centre square coloured (don't worry about directional prints facing the correct way, just place in the order you like the best).


Sew together in rows using the same 1/4" seam allowance and then join these up! The block should measure 14.5" when done (mine was 14.25", see i told you i'm not the most accurate sewer so please don't worry if it's slighty off haha). That's it, easy peasy. I think it's going to look fantastic when they are all together - i can't wait to see :)


Wednesday, 13 August 2014

Sewvivor Sew-A-Long


Let me tell you a bit about my entry for the Sewvivor Sew-A-Long first challenge which is Nautical.

This one has been so much fun to do especially since i had absolutely no idea at all what i wanted it to be and zero grand plan, it was improv all the way which suits me fine, it's how i normally work and how i love to work. My first thoughts were to just try out various improv type pieces of patchwork under a Nautical/Maritime theme square them all up and make a quilt from them..... not how it ended up at all.


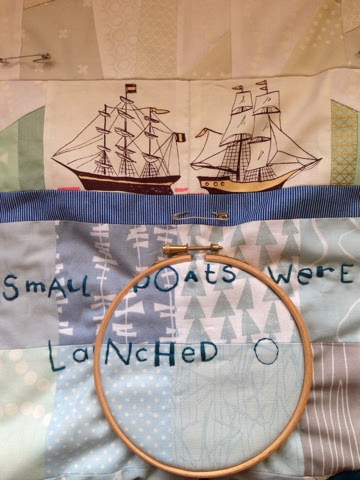
This first picture was just me starting to piece some scraps together in the hope I could make them look even slightly like the underside of a whale. I stitched together some randomly placed squares and half square triangles for the top half of the whale body and trimmed to a whale-like shape. I wanted the background to be simple square patchwork in low volume prints to make the whale really stand out when appliqued on top.


At this point i thought it would be nice to link the finished piece to Dundee and remembered the story of the Tay whale and the poem written about it. I soon realised i wanted to include some hand sewn words, so i chose these lines, "Small Boats were launched on the Silvery Tay, While the monster of the Deep did sport and play." They are from the poem The Famous Tay Whale by William Topaz McGonagall who was widely hailed as the writer of the worst poetry in the English Language!!! (Don't believe me, look it up). The whale swam into the Firth of Tay in 1883, it was harpooned, escaped and found dead a week later. The whale's skeleton is displayed in the McManus Galleries in Dundee.


I regretted the decision to hand embroider these lines pretty quickly.......it took SO long to do!


The surface area (or top section of the quilt) has some wonky improv patchwork for the sky, some strips pieced for the hills/land in the background and a couple of boats setting sail to hunt down the whale.


The quilting differs all over the piece. Some wavy lines on the darker blue sections, matchstick quilting on the underside of the whale, some free motion quilting for the sea area around the whale (I'm still a complete novice at this), and some zig zags to echo the shape of the hills up through the sky. A blue binding finished it off, darker at the bottom and a turquoise round the top. 


I'm pretty pleased with it and the reaction to it on Instagram has been so amazing, I'm totally overwhelmed by all the lovely comments people have left me about it. 

Friday, 8 August 2014

Sea Breeze Mini - finished!!!


Here it is folks, the finished Sea Breeze Mini Quilt! I love the bright colours and it has been so much fun to watch everyone's pieces come together on Instagram over the weeks. A huge thanks to Angie of Gnome Angel fame for hosting and to Megan of Canoe Ridge Creations for the easy to follow pattern.


So what have i learned during this whole quilt-a-long.....
1 - My accuracy skills suck, they still need some serious work. I need to get some more practise with HST's and learn to follow a pattern!!! It's written that way for a reason Sandra. My finished mini is 22"x 23" instead of the 22.5" on the pattern (It's actually a lot closer than i though it'd be haha!).
2 - Learn that less is more, matchstick quilting is good sometimes but not always and it will make those nice straight lines pretty wobbly as you pull the fabric.
3 - The Instagram community are fab. Everyone has been so nice and encouraging to each other and made this whole thing so much fun.

Saturday, 5 July 2014

Respect


I have so much respect for the quilters out there who can spend hours cutting, stitching, trimming and piecing! I love the look of a whole load of HSTs sewn together with the points matching up, perfectly aligned but after trying it out I know I would never have enough patience to complete a  quilt like this (unless the squares were huge or I spent about a year on the thing haha!). I had such a great idea in my mind of how this would look as a throw on the double bed on our spare room, randomly placed HSTs giving a nice random, wonky type feel to the quilt but it's not to be, not for no patience me!!!! It may just become another mini, lucky I like them so much now..... It can always just be a little mat for the bedside cabinet.... And I'll be happy with that :)